![]() Are you a new WordPress blogger? Get the easiest-to-install social media buttons. Use Shareaholic for WordPress.
Are you a new WordPress blogger? Get the easiest-to-install social media buttons. Use Shareaholic for WordPress.
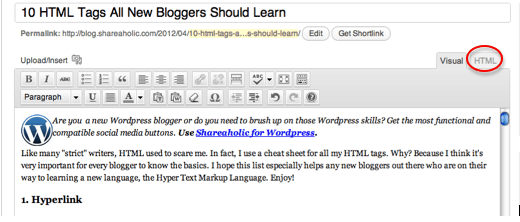
If there’s one thing that’s intimidating as a new blogger, it’s learning the basic HTML tags. While there are several short cuts to creating these HTML tags on WordPress, shortcuts aren’t always enough. When adding content to your sidebar, author profiles and even your blog posts these HTML tags will help you get the functionality and look you’re going for. All of the codes below can be entered in the HTML tab of WordPress as circled below.
1. Hyperlink
<a href=”http://www.website.com”>keyword rich anchor text</a>
Let’s start with perhaps the easiest AND most important tag for new bloggers. While it’s easy to highlight your keyword and click the “hyperlink” button, not all of your content will be uploaded in the posts or pages section. For example, if you use an “Author Bio” plugin or want to link to a website in your own User Profile, you’ll need to use the above HTML tag so the link comes out looking clean and correct.
2. Embedding Images via HTML
<img src=”http://www.website.com/imagefile.jpg” width = “400” height = “400” alt=”keyboard description”>
Apart from the obvious benefit of being able to format the picture the way you want, using an alt tag in your image tags allows search engines to find your pics.
3. Make Images into a Link
<a href=http://www.WheretTheClickWillTakeYou.com><img src=http://www.LinktoImageFileUploadedtoCMS.png alt=”keyword of what your pic is about”></a>
If you’re a blogger who wants widgets in your sidebar (including advertisements or call to action buttons), then you need this tag! Or, if you’re a blogger who promotes products use this tag to connect to the retailer via an affiliate link. Make your images come to life in 3 steps:
- Step 1 is to include the url of where people will end up when they click your picture.
- Step 2 is to upload the image to your WordPress Media Gallery, then copy the URL which tells us where the image is stored. Put the ULR into the second part of the tag as seen above.
- And lastly, don’t forget an alt tag so search engines know what your picture is.
Close the tag and you have an image that also serves as a link- neat!
4. How to Center an Image
<p align=”center”>centered object</p>
Great blogs have editorial standards that keep posts looking uniform. One of those standards might be centering all blog images. Although you can click “center” when inserting the image into a page or post, it doesn’t always stick. Add this tag in the HTML tab around the image file (which will look like the tag in #3).
5. Sub-Headings
<h3>Your Compelling Header Here</h3>
Another great editorial standard to adopt is writing posts with sub-headings. Not only will they organize your content, sub-headings make it much easier for readers to skim your article and get to the “good stuff” fast. I recommend using the sub-heading HTML tag often in your posts!
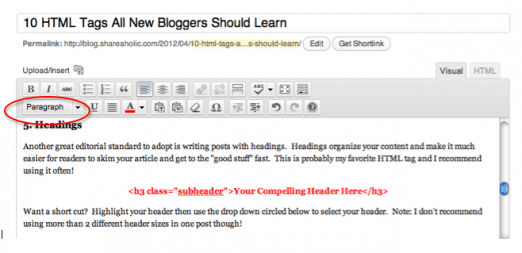
Want a short cut? Highlight your header text then use the drop down menu circled below to select Header 1 or Header 2 (depending on how big you want it). Note: I don’t recommend using more than 2 header sizes in one post though!
6. Blockquote
<blockquote>Separate a quote in your context using this.</blockquote>
Blockquotes are perfect for the creative blogger who likes to interpret quotes, poetry or song lyrics. I also recommend using the Blockquote tag when quoting an authority figure on a subject matter. Using this HTML tag gives your post visual fair because it separates the quoted text from the body of your post. Block quotes will add to the aesthetics of your blog, making your content even easier to digest.
7. Nofollow Link
<a href=http://www.example.com/ rel=”nofollow”>website examples</a>
This tag looks just like #1, EXCEPT that it has the addition of rel=”nofollow”. No Follow links are used for SEO purposes when you don’t want Search Engines to follow that link. According to Google’s Webmaster Support page, no follow links should be used in 3 cases, when linking to:
- Untrusted Content. Comment spammers are all over the internet and using no follow links on your site for blog comments may discourage spammers from messing with your site. You can always remove the no follow once comments are approved to reward quality community members and contributors.
- Paid Links. While paid links are definitely not illegal, they aren’t favored by Google either. Google urges webmasters to use the no follow tag on paid links so that paid links won’t influence search engines rankings.
- Pages Google bots can’t enter. For example search engines have no purpose for reading a sign in page or “register here” landing page, so those pages are good to use a no follow with.
8. Ordered list
<ol>
<li>list item 1<li>
<li>list item 2<li>
</ol>
When first starting out, many bloggers do not understand the value of lists as we do not want to feel like we’re writing a college essay for our readers. However, numbered lists are great for drawing readers’ attention to important points and allows them to follow your post easily.
9. Unordered List
<ul>
<li>bullet point 1</li>
<li>bullet point 2</li>
</ul>
Unordered lists are the same as ordered lists with one exception: bullets are used instead of numbers. Both numbered and bulleted lists are an effective way to organize content and make for easy reading.
10. Font Styling
<b>Bold</b>
<i>italic</i>
<s>strike through text</s>
We can’t leave this post without a little old fashioned HTML font styling! Use the tags above to make your font bold, italicized or strike through!
Which HTML tags do you use the most? Are there any other functions you’d like us to cover? Please leave us a comment below!

